

To incubate bird eggs, maintain a consistent temperature between 99.5°F and 100.5°F. Turn the eggs regularly to ensure even development.
Incubating bird eggs requires attention to detail and patience. Creating the right environment is crucial for successful hatching. Use a reliable incubator to maintain a consistent temperature and humidity level. Regularly turning the eggs helps in even heat distribution and prevents the embryo from sticking to the shell.
Monitoring these factors closely can significantly improve the chances of successful hatching. Make sure to keep the incubator clean and free from contaminants to avoid any infections. Proper care and diligent observation are key to incubating bird eggs effectively, leading to healthy and strong chicks.
Choosing The Right Incubator
Incubating bird eggs is a delicate process. The choice of incubator is crucial. A proper incubator ensures eggs hatch successfully. This section covers the essentials of picking the right incubator.
Types Of Incubators
There are several types of incubators. Each has its own features and benefits.
- Still Air Incubators: These are basic models. They use natural air flow to maintain temperature.
- Forced Air Incubators: These have fans to circulate air. They provide even temperature distribution.
- Automatic Incubators: These models adjust temperature and humidity automatically. They reduce human intervention.
Key Features To Look For
When choosing an incubator, focus on these key features:
- Temperature Control: Accurate temperature control is vital. Look for digital displays and adjustable settings.
- Humidity Control: Proper humidity levels are important. Some incubators have built-in hygrometers.
- Egg Turning: Eggs need to be turned regularly. Automatic turners are convenient.
- Size and Capacity: Consider the number of eggs you want to hatch. Choose an incubator with adequate space.
- Ventilation: Good air circulation is necessary. Ensure the incubator has vents or fans.
Here’s a quick comparison table:
| Feature | Still Air | Forced Air | Automatic |
|---|---|---|---|
| Temperature Control | Basic | Even Distribution | Automatic |
| Humidity Control | Manual | Manual | Automatic |
| Egg Turning | Manual | Manual | Automatic |
| Capacity | Varies | Varies | Varies |
| Ventilation | Natural | Fan | Automatic |
Choosing the right incubator is important for hatching success. Consider these types and features to ensure a smooth process.

Credit: www.discoverwildlife.com
Preparing The Incubator
Preparing the incubator is a vital step in successfully hatching bird eggs. Proper preparation ensures a healthy environment for the eggs. Follow these steps to get your incubator ready.
Cleaning And Sanitizing
Start by thoroughly cleaning the incubator. Remove any old materials and debris. Use a mild soap and warm water to scrub all surfaces.
Next, sanitize the incubator. You can use a mixture of 1 part bleach to 10 parts water. Wipe down all surfaces with this solution. Ensure you clean all corners and crevices.
Rinse the incubator with clean water. Let it dry completely before adding any eggs. A clean incubator prevents bacteria and mold from harming the eggs.
Setting The Temperature
Once the incubator is clean and dry, set the temperature. Most bird eggs need a temperature of around 99.5°F (37.5°C). Check the incubator’s manual for specific settings.
Use a reliable thermometer to monitor the temperature. Place the thermometer inside the incubator. Avoid placing it too close to the heating element.
Allow the incubator to run for a few hours before adding eggs. This ensures the temperature is stable. Adjust the settings if necessary to maintain the correct temperature.
Maintaining the right temperature is crucial for the eggs’ development. Always keep an eye on the thermometer and make adjustments as needed.
| Step | Action |
|---|---|
| 1 | Clean the incubator with soap and water. |
| 2 | Sanitize with a bleach solution. |
| 3 | Rinse and dry the incubator. |
| 4 | Set the temperature to 99.5°F. |
| 5 | Monitor with a reliable thermometer. |
Following these steps ensures your incubator is ready for eggs. A clean and properly set incubator leads to successful hatching.
Selecting The Eggs
Selecting the right eggs is crucial for successful bird egg incubation. It affects the hatching rate and the health of the chicks. This section will guide you on choosing the best eggs for incubation.
Egg Quality
High-quality eggs increase the chances of healthy chicks. Look for eggs from healthy birds. The eggs should be medium-sized and uniform. Avoid eggs that are too big or too small.
The shell should be smooth and without cracks. Cracked eggs can let in bacteria. This can harm the developing chick. Check for a good shape. Misshaped eggs may have problems inside.
Handling And Storage
Proper handling and storage keep the eggs in good condition. Always handle the eggs with clean hands. Dirty hands can transfer germs to the eggs.
Store the eggs in a cool and dry place. The best temperature is around 55°F (13°C). Do not store eggs for more than seven days. The longer they are stored, the lower the hatch rate.
| Storage Guidelines |
|---|
| Temperature: 55°F (13°C) |
| Humidity: 70-75% |
| Storage Time: 7 days max |
Rotate the eggs daily. This keeps the yolk centered. Place the eggs with the pointed end down. This helps the embryo develop correctly.
Setting The Eggs
Setting the eggs properly is crucial for successful incubation. This step ensures the embryos develop healthily. Follow these simple steps to set the eggs correctly.
Positioning The Eggs
Always place the eggs with the pointed end down. This helps the embryo to position correctly. Use an egg tray if available. The tray keeps the eggs stable. If not, create a nest-like structure. Ensure the eggs do not roll.
| Egg Size | Ideal Position |
|---|---|
| Small Eggs | Pointed end slightly down |
| Large Eggs | Pointed end down |
Turning The Eggs
Turning the eggs helps the embryo develop evenly. It prevents the yolk from sticking to the shell. Turn the eggs at least three times a day. Use a marker to mark one side. This ensures you do not miss a turn.
- Turn eggs in the morning
- Turn eggs in the afternoon
- Turn eggs at night
If using an automatic incubator, it will turn the eggs for you. Check the manual for settings. Make sure the turning mechanism works properly.
Maintaining Proper Humidity
Incubating bird eggs successfully requires maintaining proper humidity. Humidity plays a crucial role in the development of embryos. Without it, eggs can either lose too much moisture or retain too much, leading to failed hatching.
Importance Of Humidity
Humidity is vital for eggs to hatch properly. Eggs need moisture to develop correctly. If the air is too dry, eggs lose water. This makes the chick inside weak. Too much moisture can suffocate the chick. Maintaining the right balance is key.
Adjusting Humidity Levels
Adjusting humidity levels is simple. Use a hygrometer to measure humidity. Ideal humidity levels for most bird eggs are between 40% to 50% in the first 18 days. During the last three days, increase it to 65% to 75%. This helps chicks break the shell easily.
| Days | Humidity Level |
|---|---|
| 1-18 | 40% – 50% |
| 19-21 | 65% – 75% |
- Monitor humidity daily.
- Add water to the incubator if needed.
- Use a spray bottle to mist water.
Credit: chirpforbirds.com
Monitoring Development
Monitoring the development of bird eggs is a crucial step in incubation. Proper attention ensures healthy chick growth. This involves regular checks and understanding the key stages of embryo development. The following sections guide you through the process.
Candling The Eggs
Candling helps to observe the growth inside the egg. It involves shining a light through the egg to see the embryo. You can use a small flashlight or a specialized egg candler.
- Perform candling in a dark room.
- Hold the egg gently against the light.
- Look for veins and embryo movement.
Start candling after 7 days of incubation. Repeat the process every few days. This helps in tracking the progress and identifying any issues early.
Recognizing Signs Of Progress
Understanding the signs of progress helps ensure the eggs are developing well. Here are some key indicators:
| Day | Signs of Progress |
|---|---|
| 7 | Veins visible, embryo starts to form. |
| 14 | Embryo movement, dark mass visible. |
| 18 | Full embryo, less light passes through. |
By day 18, the egg will look mostly dark. This shows the embryo is fully grown. If an egg shows no signs, it might be infertile or not developing.
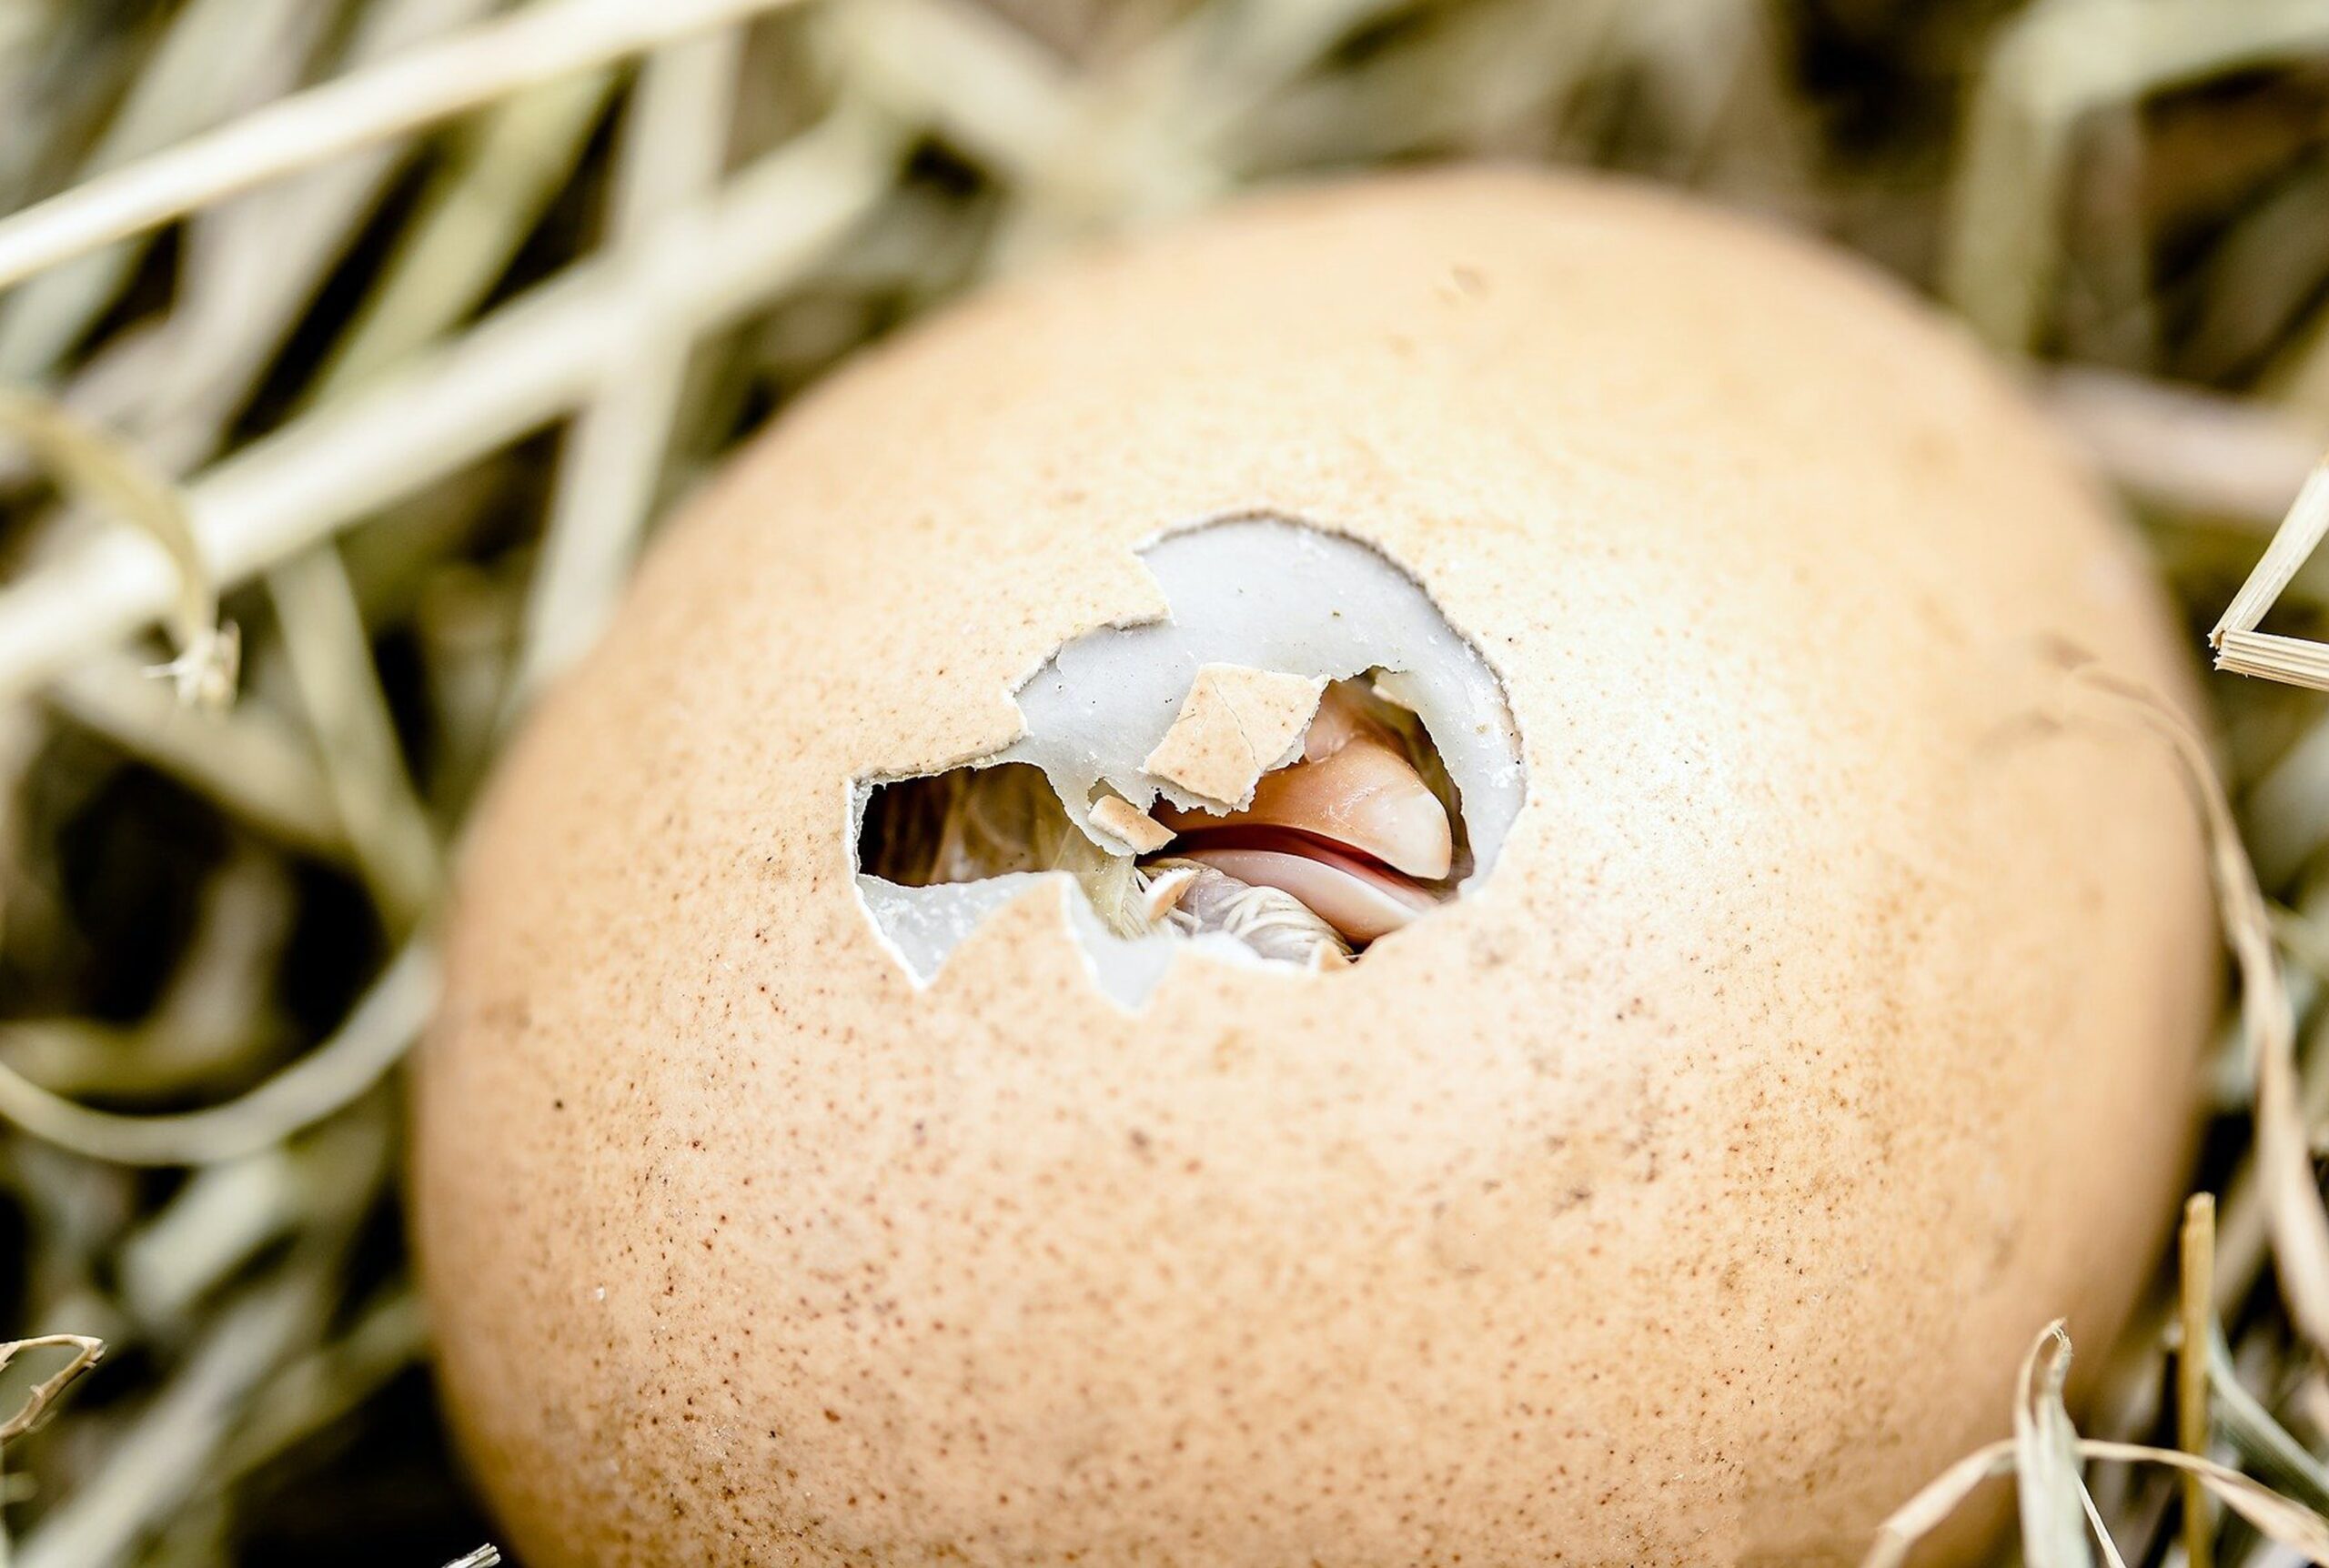
Hatching Process
The hatching process is a critical stage in incubating bird eggs. It requires careful attention and preparation to ensure a successful hatch. This section will guide you through the essential steps and considerations.
Preparing For Hatch Day
Before hatch day, check the incubator settings. Ensure the temperature and humidity levels are correct. The temperature should be around 99.5°F and humidity should be increased to 65-70%. This helps soften the eggshells.
Stop turning the eggs about 3 days before the expected hatch date. This allows the chicks to position themselves for hatching. Provide a clean and stable environment to minimize stress on the hatching chicks.
Create a checklist to ensure you have all necessary supplies:
- Clean towels
- Sanitized scissors
- Small containers for water
Assisting With Hatching
Sometimes, chicks may need help breaking out of their shells. Observe the eggs closely during the hatching process. If a chick is struggling for more than 24 hours, consider assisting.
To assist, gently crack the shell near the air sac. Use sanitized tools to avoid infections. Be very careful not to harm the chick inside.
Keep the chick warm and moist during the process. Return it to the incubator if necessary. Monitor the chick’s progress and ensure it can breathe and move freely.
Assisting should be a last resort. Most chicks will hatch on their own if conditions are optimal.
Remember: Patience is key during the hatching process. Do not rush or force the chicks.

Credit: www.wikihow.com
Post-hatch Care
Once your bird eggs have hatched, the journey has only begun. Proper post-hatch care is crucial for the survival and healthy growth of your hatchlings. This section will guide you through essential steps and tips for caring for hatchlings and their transition to a brooder.
Caring For Hatchlings
Immediately after hatching, the hatchlings are very fragile. They need constant warmth and care. Place them in a clean, warm environment. Ensure the temperature is between 95-100 degrees Fahrenheit. Use a heat lamp to maintain this warmth.
Provide a soft bedding material. Avoid materials that can be ingested by the chicks. Paper towels or soft cloths work well. This will keep the hatchlings comfortable and safe.
Monitor their health closely. Look for signs of distress such as lethargy or labored breathing. Ensure they are active and vocal. Healthy chicks will move around and chirp frequently.
Feeding is crucial at this stage. Use a high-protein chick starter feed. You can find this at most pet or farm supply stores. Ensure they have access to clean, fresh water at all times. Use a shallow dish to prevent drowning.
Transition To Brooder
Once the hatchlings are stable, they need a proper brooder. A brooder is a warm, safe enclosure for young chicks. It mimics the environment they need to grow strong.
Set up the brooder with a heat source. A heat lamp is ideal. Maintain a temperature of 90-95 degrees Fahrenheit for the first week. Gradually decrease the temperature by 5 degrees each week.
Provide ample space for the chicks to move around. Crowding can lead to stress and injuries. A brooder box or a large plastic container can work well. Ensure it has good ventilation.
Clean the brooder regularly. Change bedding to keep it fresh and dry. This prevents the build-up of harmful bacteria. Use a mixture of paper towels and wood shavings for bedding.
Continue feeding high-quality chick starter feed. Ensure constant access to water. Add a small waterer to the brooder. This helps keep the water clean and reduces the risk of drowning.
Monitor the chicks’ growth. Look for signs of healthy development. They should be growing in size and feathering out. Healthy chicks are active and curious.
Frequently Asked Questions
How To Incubate A Bird Egg At Home?
To incubate a bird egg at home, maintain a temperature of 99-102°F. Turn the egg three times daily. Ensure humidity stays around 40-50%. Use a reliable incubator. Monitor progress daily.
How To Care For An Abandoned Bird Egg?
Keep the egg warm using a heat lamp or incubator. Turn it gently multiple times a day. Maintain humidity levels around 50%. Avoid handling the egg excessively. Contact wildlife experts for proper care.
How To Incubate Eggs Without An Incubator?
Place eggs under a heat lamp or near a fireplace. Turn them three times daily. Keep humidity around 50%. Ensure consistent warmth.
How To Hatch A Bird Egg Without An Incubator Or Heat Lamp?
Keep the egg warm using body heat or a warm towel. Turn it regularly. Ensure humidity by misting lightly.
Conclusion
Successfully incubating bird eggs requires patience and careful attention. Follow the steps outlined to ensure healthy chicks. Proper temperature, humidity, and turning are crucial. With dedication, you can witness the miracle of life. Remember, each species may have specific needs.
Happy hatching!